Custom Search

Sunday, October 25, 2009

Tasty Recipe Review: Parisian Toffee Crisps

Putting the pumpkin aside for now (I'm coming back to it, don't worry!) this week's Tasty Recipe Review comes to us from Elinor Klivans's book 125 Cookies to Bake, Nibble and Savor. I bought this book like a million years ago and have really only tried very few of her recipes, not sure why because they were very good. She has little anecdotes with all of her recipes which always make for interesting reading. This recipe's introduction in her book is this one:


"Most people who dine at the Ambassade d' Avergne in Paris try the aligot, an elastic puree of cheese, potatoes and garlic which the waiters lift several feet into the air as they serve it. But I go to this family restaurant so I can have these toffee crisps that are served with the house-made ice cream. They are dark cookies with the crunch of butter toffe candy and the intense taste of caramelized brown sugar and butter."

After reading this I knew  I just HAD to try them!

One of the first things I noticed is how simple the recipe is. It's just 5 ingredients and go! No whisking or folding or incorporating. There is some sifting, but that's pretty standard. I love the simplicity.

First of all I have to say WOW. I did not expect these cookies to be so good. They are crisp and buttery and sweet, but not too sweet.They're just as she described!

Recipe follows:

Parisian Toffee Crisps

Makes 26 cookies

1 cup plus 2 tablespoons unbleached all purpose flour
1/4 teaspoon salt
12 tablespoons (1 1/2 sticks) soft butter
2/3 cup packed dark brown sugar
2 teaspoons vanilla

Position 2 oven racks in the middle and upper third of the oven. Preheat the oven to 350 degrees F. Line 2 baking shhets with nonstick liners or parchment paper. (I just greased mine)

Sift the flour and salt together and set aside.

Put the butter and dark brown sugar in the large bowl of an electric mixer and beat on low speed for about 1 minute, until the mixture is smooth and blended. Mix in the vanilla. Add the flour mixture, mixing just until it is incorporated (Whoops there's incorporated! ) and a smooth dough forms. Stop the mixer and scrape the sides of the bowl during this mixing. (She's so thorough!) Form each cookie by rolling 1 tablespoon of dough between the palms of your hands into a 1-inch ball and flattening the ball into a 1 3/4 inch circle. Place the cookies 2 inches apart on the baking sheets.

Bake about 12 minutes, until the edges and bottoms darken slightly and the cookies flatten. Reverse the baking sheets after 7 minutes, front to back and top to bottom, to ensure that the cookies bake evenly. Cool them on the baking sheets for 5 minutes, then transfer them to wire racks to cool completely. The cookies become crisp as they cool.


How easy is that? It took no time at all to make these cookies and they were great! The dough was a bit sticky but easy to work with. They cooked in exactly 12 minutes and smelled delightful. The texture is crisp and buttery, the taste,well, actually there is no better way to describe them than how she does! This is definitely a Tasty Recipe in my book!


Till next time, I hope you enjoyed this review and remember, if you have a Tasty Recipe that you would like to share, or if there's a recipe that you have been wanting to try and just haven't been able to, let me know about it. I'll give you a Tasty Review.

Thursday, October 22, 2009

Oh Pumpkin!


Pumpkin again! That's right, I'm all into pumpkin right now and seeing as how my last two attempts at making something "blogable" have failed, here's a pumpkin cake recipe for you to enjoy.

As I mentioned in my previous post, pumpkin hasn't really been my thing all these years, but after loving that pumpkin cheesecake I'm obsessed with making pumpkin desserts and I thought, why not try a pumpkin cake, see how that comes out?

You will need:

2 cups sugar
1 cup vegetable oil
4 large eggs
2 cups all-purpose flour
2 teaspoons baking soda
2 teaspoons cinnamon
1/2 teaspoon ground ginger
1 teaspoon baking powder
1/2 teaspoon salt
2 cups pumpkin puree

Combine sugar, vegetable oil and eggs in a large mixing bowl; mix well. Sift dry ingredients in a separate bowl; stir into oil mixture, beating well. Stir in pumpkin puree.

Pour batter into greased and floured bundt pan. Bake at 350 degrees F for 35 to 40 minutes.

Now this recipe was supposed to be this Sunday's review but due to the lack of material, I had to post today. I have to say though that I didn't love this cake. I would have added shredded pumpkin as if it were a carrot cake and more spices, maybe some pecans to give it a nice crunchy texture. It's a pretty good cake, but I didn't find any wow factor in it. I dusted it with confectioner's sugar and it improved, then I tried it with the cinnamon whipped cream I had left over from the pumpkin cheesecake and it was much better!


Hope you enjoy it!


Sunday, October 18, 2009

Tasty Recipe Review: Pumpkin Cheesecake

Pumpkin. So widely used at this time of year it's like a cliche. I have never been that into pumpkin, but this year I really wanted to try it out and hopefully with something different, so instead of the regular Pumpkin Pie, I decided to go for a Pumpkin Cheesecake.

This week's review is a little odd. I'm not sure if I can call it a recipe review since it is a combination of recipes with my own changes, so I guess I'm reviewing myself!

To make this cheesecake you will need:

1 Cherry Cheesecake recipe (without the cherries of course)

Prepare as you would the Cherry Cheesecake adding the following:

For the crust add:

1/2 tablespoon brown sugar
1/2 teaspoon cinnamon
pinch of nutmeg

To the filling add:

1 cup canned pumpkin puree
1/8 teaspoon nutmeg
1/2 teaspoon ginger
1/2 teaspoon cinnamon
1/8 teaspoon cloves

 I normally top off my cheesecakes with whipped cream. For this one, I decided to add cinnamon to the whipped cream and it was the perfect compliment.

Let me just say I loved this cheesecake. It was easy to make, the flavors were subtle yet there, the cinnamon whipped cream went beautifully with everything else. It's like cheesecake with a spice kick. Also, I didn't have any at the time but I feel that orange rind would go wonderfully with this dish. I found it delightful and will definitely be making this and hopefully more pumpkin recipes over and over again!

Till next time, I hope you enjoyed this review and remember if you have a Tasty Recipe that you would like to share, or if there's a recipe that you have been wanting to try and just haven't been able to, let me know about it. I'll give you a Tasty Review.

Saturday, October 17, 2009

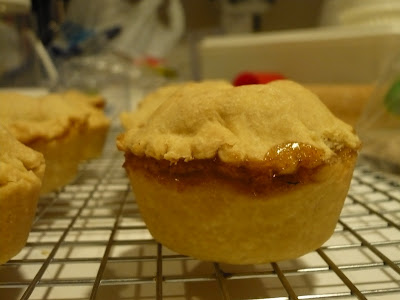
Single Serving Pies


I have had this recipe for years. I'm not sure where I got it from unfortunately, but it has always been a hit. I was in the mood for something kind of cute and instead of making a whole pie, I decided to make miniature personal apple pies.

I have to say, I wasn't sure if I wanted to post this today or if I wanted to use it for my recipe review tomorrow. But, I already had my recipe review, well, reviewed so I decided to show you these cute pies!

Recipe

Ingredients:

Crust:
2 cups flour
1 teaspoon salt
2/3 cup butter or margarine
6-7 tablespoons of cold water

Filling:

6-8 apples of your choice, no preference here
1 tablespoon lemon juice (optional )
2 tablespoons flour
3/4 - 1 cup sugar ( I like my pies on the sweet side so I use the full cup! )
1/2 - 1 teaspoon cinammon
pinch of nutmeg

Directions:
Preheat your oven to 350 degrees F.
Spray muffin tins with non stick cooking spray
For the crust, I like using the food processor, it makes it so much easier!

Mix flour salt and butter in your food processor until the butter is the size of peas. Add the water one tablespoon at a time using the pulse button until you get a uniformed dough.
On a lightly floured surface roll the dough to about 1/8 in. thick. Or you can just roll it out to any thickness you like.

Using a round cutter, cut out the bases of your mini pies.

 
Place them in the prepared muffin tins.

For the filling, peel and cut your apples into small sized chunks. Combine with lemon, sugar, cinammon, flour and nutmeg. Toss to coat.

Like so


Fill the muffin cups to the top


Roll out the remaining dough and using a smaller cutter make the tops of the pies.


Cover the pies and pinch the edges


Using a toothpick, poke holes into the tops of your pies to let the steam out


At this point you can use an egg wash on the tops of your pies if you like and even sprinkle some sugar so it looks pretty. Personally I'm lazy and didnt' feel like wasting an egg, so I didn't do it.

 Bake for approximately 45 minutes until the crust is golden brown.


As you can see, some of my filling did ooze out and spill over so be sure to pinch those edges well.

Now you have single serving apple pies!


Enjoy!!


Wednesday, October 14, 2009

Grandma's Cornstarch Cookies

These cookies are very common in Costa Rica and a family favorite.
This recipe comes from my grandmother and it's truly what I would call a comfort cookie. It's crumbly and buttery and it just disappears as soon as you put it in your mouth. The dough is a breeze to work with and it's so simple to make you won't believe it!

Traditionally these are made with guava fruit jam but you can use any kind of jam you like, they will taste just as great!

The recipe I have makes a ridiculous amount of cookies. I'm posting the full recipe but I usually make only 1/4, at the most 1/2 of the recipe because of the massive quantities of cookies that come out. Although, I'm pretty sure I could eat them all in one sitting!

Ingredients:

2 cups cornstarch
2 cups confectioner's sugar (sifted)
4 cups flour
6 sticks of butter at room temperature (that's right SIX!!!)
1 teaspoon vanilla
Directions:

Preheat your oven to 325 degrees F.

Line cookie sheets with non stick mats or use a cooking spray.

Using a standing mixer with a paddle attachment cream the butter and vanilla until it is very light in color, approximately 10 minutes.

Add the dry ingredients and then mix on low until a uniform dough forms.

How easy is that??!!!

To form the cookies, you can make balls or use a pastry bag and drop the dough in about 1/2 inch circles.I like the pastry bag personally.You can use another pastry bag for the jam or a with a spoon add a small drop in the middle.

Bake for 12 - 15 minutes until the bottoms are slightly brown.

Make sure to leave enough space between these cookies as they expand in the oven!

Like so


When the cookies come out of the oven they will look like this


See how they grew? Doesn't seem like much, but they do grow quite a bit.


That jam center is great and makes all the difference!


Enjoy!!


Sunday, October 11, 2009

Tasty Recipe Review: My Big, Fat Chocolate Chip Cookies


 This week's recipe review comes to us from the fabulous Tyler Florence at Food Network as well and I will be reviewing his recipe for My big, Fat Chocolate Chip Cookies. 

Let's get started! Below is the recipe and the review follows. 

Ingredients

  • 2 1/2 cups all-purpose flour
  • 1 teaspoon baking soda
  • 1 teaspoon salt
  • 1 cup (2 sticks) unsalted butter, at room temperature
  • 1/2 cup white sugar
  • 3/4 cup packed light brown sugar
  • 1 teaspoon pure vanilla extract
  • 2 large eggs
  • 1 (8-ounce) block dark chocolate, coarsely chopped

Directions

Preheat the oven to 350 degrees F.
Line 2 cookie sheets with parchment paper. Sift together the flour, baking soda, and salt into a medium bowl and set aside.
Place the butter, sugar, and brown sugar in the bowl of an electric mixer; cream together on medium speed until light and fluffy. Scrape down the sides of the bowl with a rubber spatula. Beat in the vanilla and eggs. Gradually add the dry ingredients to the creamed mixture and continue to mix until a smooth batter forms. Turn off the mixer and fold in the chocolate chunks using the spatula.
To form the cookies, scoop about 1/4 cup of cookie dough into your hands and roll it around into a ball; place them about 3-inches apart onto the prepared cookie sheets; you should get about 4 cookies on each pan. Press down the tops of the dough slightly and bake until the cookies are light brown, 12 minutes for chewy cookies, or about 15 minutes for crispy cookies.
Allow the cookies to cool on the baking sheets for 5 minutes before transferring to a wire rack to cool completely. Repeat with remaining dough/cookie sheets.

The first thing I noticed about these cookies is that they are indeed big and fat! The second thing I noticed is where are the chips????

In my opinion the recipe did not ask for enough chocolate, the cookies looked kind of naked. 


See! No chips!

I have to say I found this a little disappointing, let's take another look


See what I mean!

The misterious case of the disappearing chips!

Ok, putting that aside I hadn't tasted the cookies yet, maybe even without the chips they were fantastic!

So it's all about taste now cause by looks it's not going so well. Sad to say it all went downhill from there. The cookies were more cake like than cookie. It didn't appeal to me at all. The dough was normal, nothing special, just regular chocolate chip cookie dough you know, but cake like and there was just too much of it!

I'm sorry Tyler, I love you and everything but these cookies just didn't cut it for me. I will stick to my variation of Martha's cookies... with a little Tasty twist for the time being.

I will say this, on the plus side, they are very easy to make!

Till next time, I hope you enjoyed this review and remember if you have a Tasty Recipe that you would like to share, or if there's a recipe that you have been wanting to try and just haven't been able to, let me know about it. I'll give you a Tasty Review.


Thursday, October 8, 2009

It wasn't me


Ok so maybe it was, but I couldn't help it, they looked so good!

Last week I posted about the effects of a banana cupcake that had no baking soda. You can check out my post HERE.

Well, I decided to make some of my banana cupcakes yesterday and share the recipe so that you could see what I meant.

Come on, tell me they don't look good???


Here's the recipe for you to enjoy

Banana Cupcakes

Ingredients:

1/2 cup ( 1 stick ) butter or margarine at room temperature
1 1/2 cups sugar
1/2 cup milk
2 eggs
1 teaspoon vanilla
1 teaspoon baking soda
2 teaspoons baking powder
2 cups flour
1/4 cup of wheat bran ( if you can find it with honey even better)
2 - 3 tablespoons honey ( I like to use 3 depends on your taste )
5 ripe bananas
Directions:
Preheat oven to 400 degrees F.
Place paper liners into muffin tin.

Cream the butter and sugar in the bowl of an electric mixer fitted with the paddle attachment for about 5 minutes, until light and fluffy. Add 3 bananas. With the mixer on low add eggs one at time, mixing well after each addition. Scrape the bowl and add the milk and vanilla. (The mixture will look curdled.) Add the dry ingredients mixing  until just combined. Add the remaining bananas and honey mixing on low speed until bananas are just broken down but you still have some medium sized pieces.

Pour into tins filling 2/3 of the way. I like using the 1/4 cup measurement for this. Bake for 20 minutes.

Enjoy!!

Sunday, October 4, 2009

Tasty Recipes


Being a baker I love to try new recipes all the time. I have found some wonderful recipes as well as disasters!


This is why I have decided to create this segment Tasty Recipe Review. Every Sunday, I will post a new recipe that I have tried out during the week and let you all know if it’s up to my standards and hopefully yours as well!


This week’s recipe comes to us courtesy of Paula Deen from foodnetwork.com (don’t you just love her?!) and it is a Ginger Cookie recipe.


Recipe:


Ingredients:


* ¾ cup vegetable shortening

* 1 cup sugar plus more for rolling

* 1 large egg

* ¼ cup molasses if I don't have molasses I use dark corn syrup, works just as well

* 2 cups sifted all-purpose flour

* 2 teaspoons baking soda

* 1 teaspoon ground cinnamon

* 1 teaspoon ground ginger

* ½ teaspoon ground cloves

* ½ teaspoon salt


Directions:


Preheat oven to 350 degrees F.


Line cookie sheets with parchment paper or nonstick baking mats. You can use a nonstick spray as well.


Using an electric mixer at low speed, cream the shortening and sugar until thoroughly combined. Add the egg and molasses and beat until completely incorporated.


Sift together the flour, baking soda, cinnamon, ginger, cloves and salt and add to the mixture. Stir until combined.


Roll the dough into balls about 1 inch in diameter. I use the tablespoon measurement, they come out perfect!


Roll the balls in sugar.


Place ½ inch apart on the prepared cookie sheets. Flatten the balls slightly with your fingertips.


Bake for 12 minutes. Cool on wire racks.


I find that 12 minutes is the exact amount of time if want a nice crispy outside and a somewhat chewy middle. If you want a much crispier cookie all around bake for approx. 15 minutes.


This is what the cookies look like when they come out of the oven


See how the tops are all crackly. That's from the sugar that we used to roll them in before baking.


Take a closer look


 They look good right?


Well, the truth is they are good. They're very good!


These cookies are truly delicious. The recipe is so easy and quick to make, you can even ask your kids to help. I'm sure they'll love making the balls and rolling them in sugar. The dough is great to work with, it's not sticky at all. I found it perfect.


Another great thing about this recipe is that your house smells wonderful as they're baking!


Did I mention they were delicious? OMG! I wanted to eat them all straight out of the oven.


I found that they can also make a great gift, especially for the holidays, they have all those autumy - chistmasy  spices baked right in!

In the end, these cookies deserve all the stars available, this is truly a Tasty Recipe!


If you have a Tasty Recipe that you would like to share, or if there's a recipe that you have been wanting to try and just haven't been able to, let me know about it. I'll give you a Tasty Review.


Saturday, October 3, 2009

Winnie The Pooh

How cute is Winnie The Pooh?

I was asked to make a Winnie the Pooh cake along with 12 cupcakes for a girl's birthday. Freaking out here! How am I going to make Winnie the Pooh???

I was really nervous that I wouldn't be able to get him looking right, but it turns out the didn't come out that bad after all!

Here, why don't you be the judge:


Kinda cute right?

Here's a closer shot


Ok ok, I know he's not perfect and doesn't look exactly like Winnie the Pooh and looks like he's been eating a little too much of that "hunny" but hey, he still looks pretty good to me! 

The cake inside was three different colors, red, orange and yellow, it looked very cool! 

And take a look at the matching bee cupcakes:


How cute!!!


Thursday, October 1, 2009

Bonjour French Cuisine!!!


Aaah the french and their wonderful pastries!!!!  Don't you just adore their Eclairs, Croque en Bouche, Croissants and Pain au Chocolat? I know I do!!!!

There are of course many other kinds but these are the ones that come to mind when I think of french pastries.

Just this morning I had a wonderful Pain au Chocolat from a local patisserie which I believe is the best one here yet.

I do have experience in making Eclairs and Cream Puffs , which are used in the Croque en Bouche (take a look at my Caramel Cream Puffs recipe, they're delightful!) for quite some time but I have never mustered the courage to try out the Croissants or Pain au Chocolat. It is definitely a labor of love and very intensive.

There are hundreds of recipes online for any one of these pastries. If you have managed to create one or more of these exquisite works of culinary art I would love to hear about it. Do you have a favorite? Which is the best recipe you have tried? Have you ever tried and failed? Any and all experiences all welcome!

I will, one day soon, take out the time to bake some of these and will surely let you know how it goes!


Au revoir!!!
 

blogger templates | Make Money Online