Custom Search

Monday, December 28, 2009

Cooks and Cookies


My family is filled with cooks. It starts with our grandmother, she is a wonderful cook, my mother is an excellent cook, my aunts are great cooks, my cousin's a chef, I think even my uncle is a good cook. I have one sister who doesn't really like to cook, but I'm sure that if she wanted to cook, she'd be great. So you see, we come from cooks and we are cooks which is why it doesn't surprise me that my nieces love to cook. They like to bake most of all, but what kid doesn't love to make cookies right? I'm sure when they are all grown up they are going to be marvelous cooks!

I mentioned I had five nieces right, yep FIVE girls and they all want to bake cookies every single day of course! Just the other day, my third niece decided to alter the recipe for Grandma's Cornstarch Cookies and add chocolate chips, just like that, let's add chocolate chips. Well, they turned out great! Then I decided to roll some around in coconut before baking, just to mix things up some more and those turned out really good as well.  So I guess anything can happen to recipes with a family filled with cooks!

If you would like to try these new cookies we came up with, follow the recipe for Gradmas's Cornstarch Cookies omit the guava jam and add chocolate chips accordingly. I made 1/4 of the recipe and added 3/4 cup of chocolate chips and then rolled them around in coconut. But I like lot's of chips in my cookies, if you want less chips cut down to 1/2 cup and so on. If you don't like coconut just take it out. Remember to flatten the cookies some with your fingers so they spread out rather than puff up.

Enjoy!

Thursday, December 24, 2009

A Very Very Merry Christmas!

Hooray I have a camera again! Actually, I always had a camera I just couldn't upload pictures, so, hooray I can upload pictures again! And just in the nick of time to show you all the Christmas cookies my niece and I made.

We had a great time decorating. Remember I used Martha Stewart's recipe for Cinnamon Sugar Cookies and for the icing I like to make a sugar icing which I prefer much much more than the regular royal icing. This icing does dry hard but not quite as hard and it has a nice matte finish.

For the icing you will need to mix:

1 cup confectioner's sugar
4 teaspoons milk
2 teaspoons light corn syrup
1/4 teaspoon vanilla

And that's it! Very easy and I just looooooooove the fact that it has no egg whites!

On to the cookies! I had gotten some squeeze bottles earlier in the day so that it would be easier to pipe the outlines and flood the cookies. Here's my niece working hard on a Christmas bell. She's so focused! She wanted them to be perfect and smooth. This is actually the only good picture of her I have, or let's say it's the best picture out of all the not so great pictures I have do to lighting issues.


After flooding came the dots, lines, sprinkles, Christmas colored nonpareils, sanding sugar, star sprinkles, tree sprinkles, big polka dot kind of sprinkles and whatever we could think of!


Here's a shot of some of our finished work! Aren't they really cute?
She came up with those squiggly lines and stars , I'm so proud!


We're probably leaving some out for Santa and having the rest tonight after dinner!

I would like to wish you all a very very Merry Christmas and I hope that you have a wonderful night with your loved ones which are the best presents we could ever get.

MERRY CHRISTMAS EVERYONE!!! 

Sunday, December 20, 2009

Christmas and no camera!


I still have no camera!! Can you believe it?  I know I can't! Which is why today my pictures come from some of my very talented friends at Flickr. I have linked their names to their Flickr photostream. That first picture is from Indulge Dessets, she's just amazing, here cookies are out of this world!

That said, this post is about Christmas cookies.  What's Christmas without Christmas cookies right? I mean come on! They are so pretty and so festive that you feel bad about eating them. But are they really good or they just there to look pretty?

I love decorated cookies. I'm in awe at the things I see sometimes, and even though it is hard work to make really pretty cookies I enjoy doing it.

This year I wanted Christmas cookies that weren't the regular sugar cookies or gingerbread people. I wanted Christmas with a little kick, so I thought that sugar cinnamon cookies could be really good and a nice twist to the same old same old.

So I turned to the ever wonderful multitasking goddess that is Martha Stewart to try out her Cinnamon Sugar Cookies

These cookies were really good and of course easy to make, but I couldn't really taste the cinnamon. That's the only downside to the recipe, otherwise, the dough is a delight to work with and they plump up and bake beautifully!

Hopefully I will be able to show you my decorated Christmas cookies and a little more of what I've been baking before Christmas. Keep your fingers crossed, I know I am...

In the meantime enjoy these beautiful Christmas creations!


Aren't they absolutely fantastic?????

Sunday, December 13, 2009

Tasty Recipe Review: Bell'alimento's Panettone!!!


Panettone is one of my favorite things ever, especially this time of year, but it is a labor of love. To make Panettone requires a lot of patience and I just don't have that.  So you can imagine how I felt when I saw that my friend Paula from Bell'alimento posted a simple Panettone recipe. I was thrilled! I was so excited I nearly cried, especially since moments before I was thinking that I really wanted to make my own Panettone this year! Coincidence, I think not!

(The picture is actually her picture, Bell'alimento's, cause go figure I suddenly lost the cable that attaches my camera to the computer! So credits go to her, beautiful isn't it?)

I immediately headed over to her blog to check out her recipe. If you would like to see her Panettone recipe, head on over to PaulaDeen.com, that's right Paula Deen! She's a contributor at her site , isn't that just amazing???? You can find her recipe right here.

This recipe was very simple, you just add and mix, nothing to it!

Now this Panettone is actually a cake and not a bread like the traditional recipe, that's why it's much easier to make. That being said, it was very good! I loved the fruits she added. I believe the traditional recipe calls for rum soaked raisins but I think her combination of cranberries and golden raisins was fantastic!

On the other hand, I forget that Italian's sweet tooth is not as sweet as mine, so for me, it could've used a bit more sugar. Paula, you know I love you, I'm just saying that my taste buds need something sweeter. But to sum it up, these are very easy to make and very tasty! I think they would make wonderful presents this year.

Till next time, I hope you enjoyed this review and remember, if you have a Tasty Recipe that you would like to share, or if there's a recipe that you have been wanting to try and just haven't been able to, let me know about it. I'll give you a Tasty Review!

Sunday, December 6, 2009

Tasty Recipe Review: S'mores!!!!


Have you ever just needed to eat something? You know, you have this feeling that you simply must have something or you will absolutely go crazy? A craving I guess if you will, but a craving that is driving you mad!! This is what happened to me. I was taking a nap and I woke up needing S'mores. Not just craving them, but needing them. I had to have them, it was driving me insane! Now this may seem normal to a lot of people, cravings are an everyday thing, everyone has them, but you see, I have never had S'mores before! Never, not once have I tried them. I've always wanted to because they sound delicious, but I've never had the chance, so I was a little confused by my craving.

Now, I wanted these from scratch, so I decided to make my own graham crackers. I looked online and found a recipe from Smitten Kitchen that sounded simple, delicious and best of all I had all the ingredients in my pantry. I also loved the fact that it called for a food processor. I think making dough in a food processor is so much easier than user your mixer. (You can use your mixer if you don't have a food processor.)

Graham Crackers

2 1/2 cups plus 2 tablespoons (375 grams) unbleached all-purpose flour (a swap of 1/2 cup with whole wheat flour or 1 cup whole wheat pastry flour works well here, too)
1 cup (176 grams) dark brown sugar, lightly packed
1 teaspoon (6 grams) baking soda
3/4 teaspoon kosher or coarse sea salt (4 grams)
7 tablespoons (3 1/2 ounces or 100 grams) cold butter, cut into 1-inch cubes (This is just a bit less than a stick)
1/3 cup (114 grams)  honey
5 tablespoons (77 grams) milk
2 tablespoons (27 grams) pure vanilla extract

You start by combining the flour, brown sugar, baking soda, and salt in the bowl of a food processor fitted with the steel blade or in the bowl of an electric mixer fitted with the paddle attachment.Pulse or mix on low to incorporate.


Add the butter and pulse on and off on, or mix on low, until the mixture is the consistency of a coarse meal.


In a small bowl, whisk together the honey, milk, and vanilla extract.


Add to the flour mixture and pulse on and off a few times or mix on low until the dough barely comes together. It will be very soft and sticky.


I did not find the dough to be that sticky. It was actually easy to work with.

Lay out a large piece of plastic wrap and dust it lightly with flour, then turn the half the dough out onto it and pat it into a rectangle about 1-inch thick. Reapeat with the other half. Wrap it, then chill it until firm, about 2 hours or overnight.

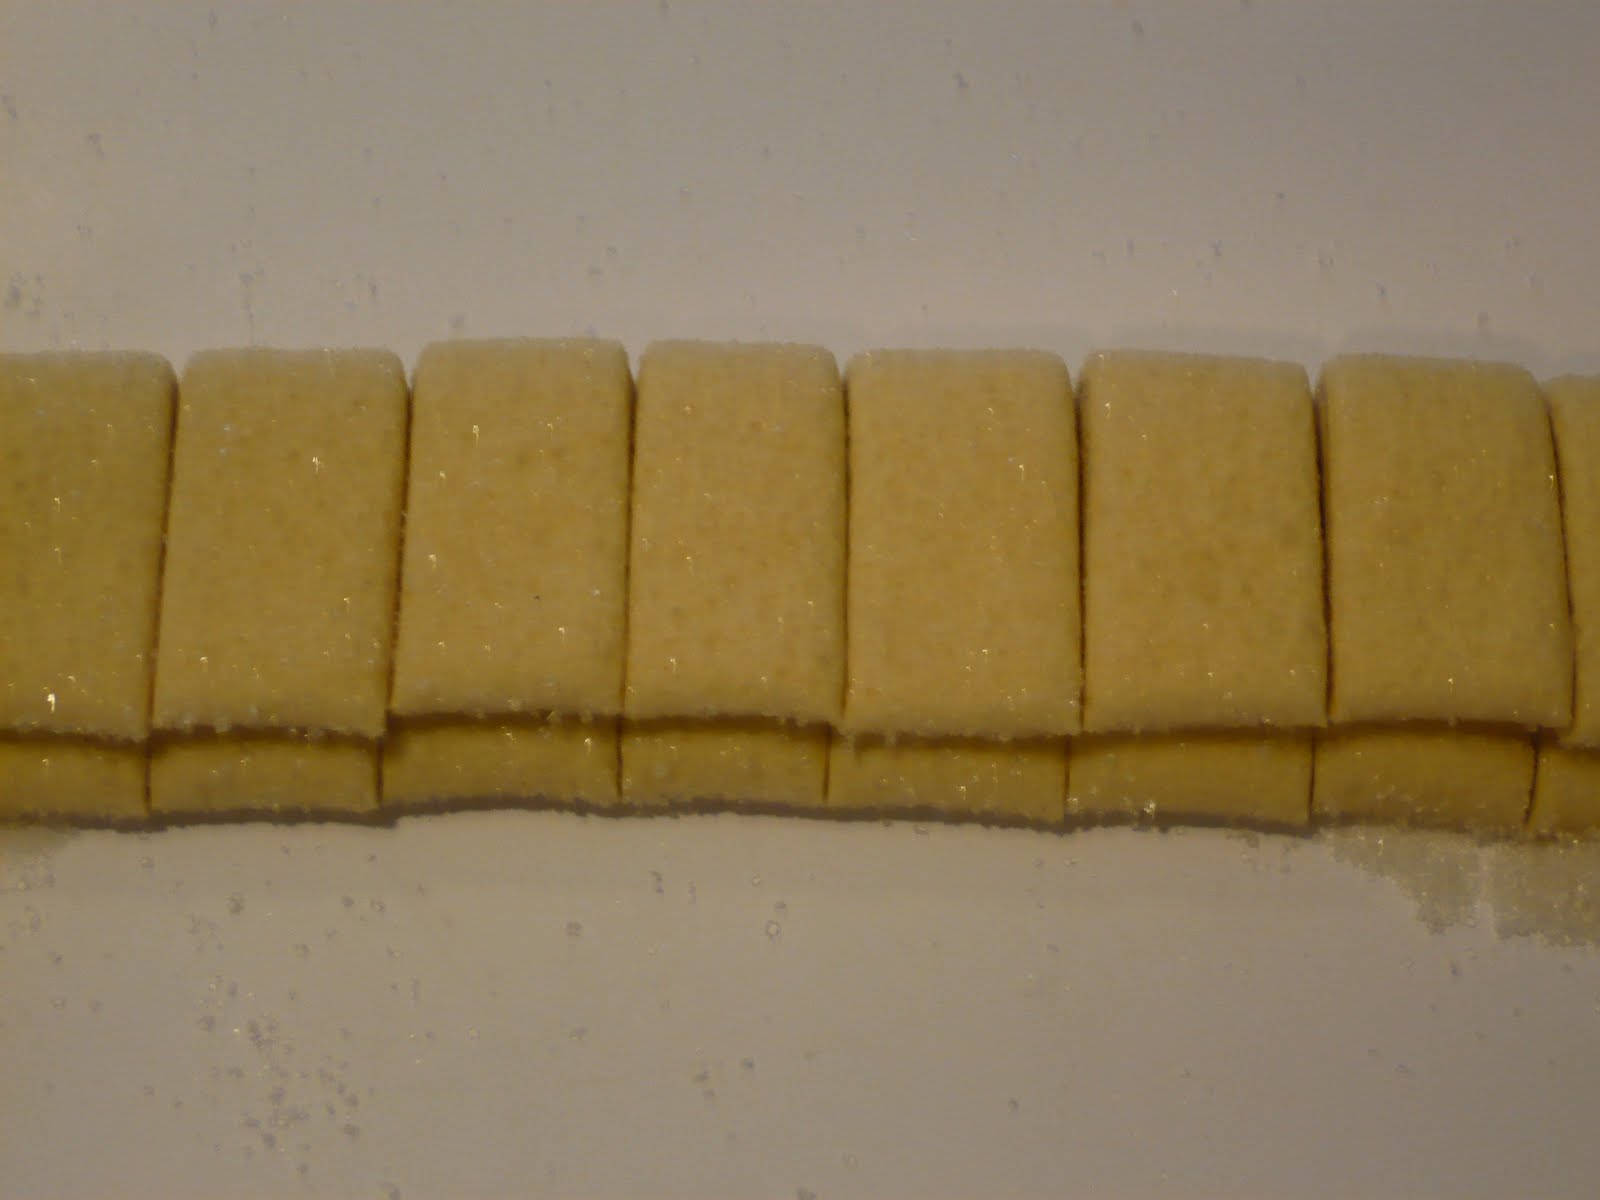
In a lightly floured surface, roll the dough to about 1/8 inch thick. Since the dough is a bit sticky, use flour as necessary. Cut into a rectangle and then cut out squares in the size desired to make your graham crackers.


Place the crackers on one or two parchment-lined baking sheets. Mark a vertical line down the middle of each cracker, being careful not to cut through the dough, this is to make the traditional cracker design.


I used a fork, but you can also use a toothpick or the back of a skewer to make any pattern you like. Preheat your oven to 350 degrees F and bake the cookies for 15-25 minutes. Now this is a very wide range, mine were done in 15 minutes so be sure to check your cookies! 

To make the S'mores, what I did was that about 4-5 minutes from the cookies being ready I placed a marshmallow on top so they would puff up and toast in the oven. I had chocolate chips and not the traditional Hershey's candy bar so after taking out the crackers from the oven I  placed 4-5 chips on top of the marshmallow. Be careful, they're hot!


Take a hot cookie and place on top of the marshmallow and chocolate and press down.


And there you have it! That's how you make S'mores with homemade graham crackers!

These were absolutely fantastic! The crackers alone were wonderful. Not to sweet, with a light honey taste, they were absolutely delicious! And the S'mores, OMG!!! I don't know if I'm delighted or terrified that I finally tried these. I know my hips are probably terrified because they're amazing!

Till next time, I hope you enjoyed this review and remember, if you have a Tasty Recipe that you would like to share, or if there's a recipe that you have been wanting to try and just haven't been able to, let me know about it. I'll give you a Tasty Review!


Friday, December 4, 2009

Cute Cake!!


This is a small post.

I just wanted you to show you a cute cake I was asked to make in sort of a hurry.

I was asked for a cake that had fuschia black and white.

This is what popped in my head as I didn't have much time to brainstorm on the design.

The bottom layer is chocolate cake with chocolate buttercream mmmmmmmmmmmm.

The top layer is vanilla cake with vanilla buttercream mmmmmmmmmm.

I think it came out pretty cute. What do you think? Would love to hear comments!!

Sunday, November 29, 2009

Palmiers


You may have noticed that today's post is not entitled Tasty Recipe Review. That's because there's really not that much to review, but I do have for you 2 Palmier options. One is the classic sugary elephant ears that we all know and love and the other is something I decided to whip up for Thanksgiving, sort of pumped up Palmiers if you will.

I had mentioned that I was dying to try and make these sweet morsels, well now I got the chance. I just went for it, decided to go get myself some puff pastry, you know I'm not going to make it it's too time consuming, and just go for it.

They are so unbelievably easy to make, I think I might just whip up a batch every single day for the rest of my life! Of course my hips will hate me for it, so maybe every other day.

All you need to make these are puff pastry and sugar and that's it! It's that simple.

You can find puff pastry anywhere these days, but if you would like to make it (congratulations, I admire you!) I found this site that shows you how to make your own puff pastry.  

Sprinkle your rolling space with about 1/4 cup of sugar and lay your puff pastry sheet on top like so:


Now sprinkle another 1/4 cup of sugar on top of the pastry


Now you have to roll the sugar into the dough


See how the sugar becomes embeded into the pastry, when the layers spread during baking it's going to be one big delicious sugary goodness!


Now on to forming the popular elephant ears. You start by folding in the sides:


Fold another time:


And one more time:


You end up with a long roll of dough, press it down and then cut it to form the rectangles:


These are your Palmiers. I rolled the tops in sugar, you can also coat them with an egg wash if you like. Place them on your cookie sheet about 2 to 3 inches apart to give them room to puff up.


Aren't they cute?


These go into a 375 degree oven for 12 - 16 minutes until they are golden brown. You may have to turn them over in the middle of baking if you see the bottoms are cooking way faster than the tops.

Remove them from the cookie sheet while still warm and let cool on a wire rack. You are now ready to pop these babies in your mouth, Yum!!!


Now for Thanksgiving, I decided to give these a twist. I filled them up with pumpkin, dates and almonds. You prepare them exactly the same way, you just add filling instead of sugar to the dough.

For my pumpkin filling you will need:

1 cup pumpkin puree
1/4 cup brown sugar
1/4 cup finely chopped dates
1/2 cup chopped almonds

Mix these together to make the filling:


Then proceed the same way as the sugar Palmiers, roll the dough in sugar, but instead of sprinkling sugar on top of the dough, spread out the filling and form your cookies.


Here is the finished product, looks good right. Very tasty!


You can fill these with anything, sweet, salty, whatever you like, or make them with just sugar, they are always going to be delicious ... Enjoy!!!


Wednesday, November 25, 2009

Mixing it up for Thanksgiving!


Thanksgiving is upon us!!!

We don't really celebrate Thanksgiving in Costa Rica, why would we right? But seeing as my sister is married to a Gringo (that's what we Ticos call someone from the US of A) it's celebrated in my house. We're having a big dinner tomorrow and I get dessert of course. I've been racking my brain to try to come up with something different. I don't really like Pumpkin Pie, it's never been my thing. There's just something about it that doesn't appeal to me. I LOVED the Pumpkin Cheesecake I made, that was absolutely wonderful, but they had tasted that already. I didn't feel like repeating desserts, I wanted to come up with something that would knock somebody's socks off!

Talking with my sister the other day I told her that I have been wanting to make Torta de Elote, which would translate into something like corn pie.( It's more of a corn pudding than a pie actually). She loves the stuff!!  Myself, not so fond of that either but I have been wanting to share the recipe and since we're having Thanksgiving at her place I thought it would be a good idea to make it. The only thing is regular Torta de Elote doesn't feel that Thanksgiviny (yes, that's an actual word) so she suggested adding pumpkin to the mix. Her exact words were: "Corn and pumpkin, what's more Thanksgiving than that???" So I thought, what the hell, let's give it a try.

You will need:

1 can sweetened corn
1 can sweetened condensed milk
2 cups milk
2 eggs
1 stick butter melted and cooled
1 teaspoon vanilla
1 cup pumpkin puree

This is usually made in a blender, fast and simple! Seeing as how when I went to get out my blender a very important part was missing (go figure!) I had to improvise. So I decided to use my food processor instead. It was a bit complicated because you have to blend the corn and milk first and all the liquid was oozing out of the food processor, so I just added all the other stuff at once to see if it would combine better and gave it a whirl.

So in order to make this Torta de Elota you throw your corn and your milk into the food processor blender and whip that up a bit. Then you add all the other ingredients and give it another whip and voila you're done! how easy was that?

Grease a, I would say, 9X12 in. pan, dish, tray, I don't know, whatever you would like to bake it in and pour your corn and pumpkin mixture right in.


Pop it in a 350 degree oven for approx. 45 minutes until it's golden brown. Mine took a bit longer, about 55 minutes just check it and when it's nice and golden pull it out and cool on a wire rack.


Here's a closer look. See... golden!


I'm not sure if you're supposed to serve this warm or let it cool completely, I think it's just a matter of taste. When it's still warm the pudding is more on the soft-almost-bordering-close-to-the-runny side, once you let it cool it will thicken.

I decided to top this off with some cinnamon whipped cream, which is just whipped cream with a little cinnamon, nothing fancy. I think it complimented it really well. It's still not my favorite but it's pretty good and the whipped cream gave it a nice extra oomph.

There are two things I would like to point out. I used the canned pumpkin puree which comes with all the spices so I didn't add any more, if you use homemade pumpkin puree you can add cinnamon, nutmeg, cloves and ginger to give it that pumpkin pie flavor and of course you can add the amount you like to suit your palate. The other thing is that I wanted a mild pumpkin flavor, I did not want the pumpkin to overpower the corn but instead blend with it and merge the flavors. If you would like to have a more pronounced pumpkin flavor just adjust the puree quantity to taste.  

Enjoy and Happy Thanksgiving!!!

Sunday, November 22, 2009

Tasty Recipe Review: Betty's Oatmeal Cookies


I have had this book forever. It's worn, torn and burnt as you can see.


I have used it countless times and for numerous ocassions. I always thought this was a Betty Crocker cookbook, not sure why, maybe the red and white or maybe cause my mom always called it that. But it isn't is it. Is it? There seems to be a new cookbook out Better Homes and Gardens 12th Edition. I wonder just how improved it is.

I have been craving oatmeal cookies lately but I really wanted them to have some sort of twist. I wanted something different. I searched the web for recipes and founds tons of stuff, cookies, bars, etc. but nothing really jumped out at me. So I decided to go look in my old trusted Betty Crocker cookbook. I'm sorry, I will keep calling it that forever I think. she had oatmeal cookies with variations, chocolate chip, fruit topping. Hmm, sounded interesting. Wanting to get rid of unused apples that were sure to spoil in the future so I chose to try the oatmeal cookies with fruit topping. I also left some without the topping so I could taste only the cookie.

The regular oatmeal cookies were very good. Crispy on the outside and chewy on the inside. Very tasty.  I don't know if you can really do wrong by an oatmeal cookie recipe, but I liked these, very good.

The oatmeal cookie with apple topping, wow! Very very nice combination, chewy cookie with crisp sides and outside, sweet apple cinnamon topping. I was very surprised. I didn't think they would be this good actually. I thought they would just be ok. It's like a cookie with a kick you know, that little something extra really made a difference.

I must say, they are pretty filling, I usually have like 3 or 4 cookies (right...), but with these ones 2 was enough for me. Don't get me wrong, they are very very good and tasty, but they are somewhat filling. But that's a good thing!

I found the recipe very simple and quick to make. Granted, it does take a little time for the topping to cook, but it's fairly quick, you can make these in 30 - 45 minutes. I like that, quick and easy recipes, they're the best!


 To make these delicious cookies you will need:

3/4 cup butter or margarine
1 3/4 cups flour
1/2 cup sugar
1 cup packed brown sugar
1 teaspoon vanilla
1/4 teaspoon baking soda
1 teaspoon baking powder
1/2 teaspoon cinnamon (optional)
1/4 teaspon ground cloves (optional)
2 cups rolled oats

In a mixing bowl beat butter or margarine for 30 seconds. Add about half of the flour, brown sugar, sugar, egg, baking powder, vanilla and baking soda. If you choose to add cinnamon and cloves (I did) add those as well. Beat till thoroughly combined. Beat in remaining flour. Stir in oats.

Drop by rounded teaspoons (oops I think mine were a bit bigger!) 2 inches apart onto an ungreased cookie sheet. Bake in a 375 degree F oven for 10 to 12 minutes or till edges are golden. Cool cookies on a wire rack.

Fruit topping:

To make the fruit topping, in a medium saucepan combine 11/2 cups finely chopped (finely??? hmmm) peeled apples, 1/2 cup sugar, 1/3 cup raisins, 1/3 cup chopped pecans (ok so I didn't have raisins and pecans, so I just did apples, some cinnamon and sugar, could that be bad? I also added about 2 tablespoons brown sugar,just cause it was left over from the dough and I thought, this can't hurt!) and 2 tablespoons of water.

Bring to boiling, stirring constantly. Reduce heat. Simmer till fruit is tender and most of the liquid has evaporated, stirring occasionally. After dropping the dough onto the cookie sheet, press centers with your thumb. Fill each indentation with a level teaspoon of topping. (I made like little wells on mine, I was affraid the topping would spill down the sides. I also have to admit that I didn't measure the level teaspoon, I just eyeballed it, Yeah, I'm a rebel!)

I would like to apologize for the lack of pictures, but besides the fact that my camera sucks (yes it's the camera!) my lighting is apparently worse, so I really don't have any decent pictures of these cookies or the process except the one up top.


Till next time, I hope you enjoyed this review and remember, if you have a Tasty Recipe that you would like to share, or if there's a recipe that you have been wanting to try and just haven't been able to, let me know about it. I'll give you a Tasty Review!

Wednesday, November 18, 2009

Whole Wheat Goodness


I love Focaccia, who doesn't right? A long time ago I had an Italian boyfriend for many years. Great guy, just not for me, anywayssssss,,, his mother got a hold of this Focaccia recipe and we would make it all the time, I just love it. The Focaccia is thick and crisp on the outside while soft in the center. Olive oil, salt and Rosmarino (Rosemary) are what top this delicate bread and give it a wonderful smell and taste. Here in Costa Rica, people are used to the flat Focaccia, you know more of a flat bread than a thick bread. I like them both but I believe I prefer the thick one.

Seeing as how I had no regular flour at hand and am in sort of a health kick at the moment, I used whole wheat flour, I said, what the hell, let's try to make it whole wheat and see what we get, it can't be that bad.

It came out really good actually, I mean, it's the same recipe, you're just substituting the type of flour right? I like whole wheat and I thought this Focaccia was really good, the texture may be better with regular all purpose flour but this option is somewhat better for you.

500 grs. whole wheat  flour (or use regular that's ok and yes, Italians use grams, not cups)
1 small glass of warm water ( this is how I got the instructions, I'm just passing them along)
3 teaspoons and a little bit of dry active yeast
salt
Olive oil
Rosemary

Pour flour and salt in a bowl, mix to combine. Dissolve the yeast in the water until there are no lumps. Add to the flour and salt, stir until a uniform dough is formed that no longer sticks to your hands. Form into a ball, cover and let rise. This takes about one hour, but the more it rises the better the end result.

When the dough has at least doubled in size, grease a pan with oil, using your hands. That's right, pour some oil into a pan and spread it all out with your hands. Now take the dough and spread it out onto the pan. I like mine kind of square, I don't know where it says that by law they have to be round. But you can spread it out any way you like, hell, make a star shape if you want, as long as you spread it out. Poke holes into the dough with a fork or knife. Sprinkle Rosemary, salt and drizzle top with olive oil.

Now the dough is ready for baking, that's right, you don't need to let it rise again, goes straight into the oven.

As for the temperature, my instructions were, have your oven as high as it goes. Ok, what temperature? As high as it goes. My oven goes to 550 F, so that's what I had it on. It sounds scary I know, but trust me, just turn that sucker on to the max setting and pop the Focaccia right in. It usually takes about 20 minutes for it to be done, but be sure to check it. Mine was done really fast like 15 min this time, maybe it was the whole wheat flour huh. I suggest you check after 10 minutes, just be sure that the bottom is golden and crisp. Take it out and enjoy!!!!


Came out kinda round in the end huh? Still tastes great though!


Did you happen to notice how many times I said Focaccia????? Love it!!!!
 

blogger templates | Make Money Online